

If you travel out into the rugged Sonoran Desert of central Arizona, through mountainous national parkland and groves of noble Saguaro cactus, you may discover a small raw vegan retreat center called Life Energy Awakenings. There they remind their guests of a simpler, healthier way of life, removed from the stresses of society, and instead surrounded with the natural beauty of the desert wilderness. Through classes on nutrition and raw veganism, guests are similarly reminded of a simpler, healthier way of eating.


But Life Energy Awakenings takes it one step further, and this is the part that excites me the most: they invite guests to experience living within a community of people, practicing sustainability in their everyday lives through organic gardening and natural building. They grow produce in organic gardens both on site and in clients’ backyards, for use in their retreats, in a local restaurant, and for sale at a local farmer’s market.


In the natural building department, they have several interesting projects going on, including rainwater catchment and water-saving irrigation practices; an impressive greenhouse (or rather, shadehouse) built largely of salvaged materials; and last but not least, a new cob roundhouse being built on site, showcasing a variety of natural building methods.
In 2014-2015, I had the good fortune of teaming up with Life Energy Awakenings and Travel to Learn, to help build their beautiful new cob roundhouse with reciprocal roof. We relied on a volunteer workforce recruited through Wwoof-USA, natural building workshops promoted locally, and of course lots of help from friends and neighbors to see us through the project.


Carlos Bill from Travel to Learn had overseen the laying of the gravel foundation and cement stem wall the year before. He has written a detailed walkthrough of this stage of the project, complete with photos, videos, materials costs, fuel consumption, etc. You can read more by visiting his page here. I will be providing a brief overview of this stage of the project in the following paragraphs, before continuing on to describe the work we did involving the cob walls and reciprocal roof.
A trench 20” deep, 24” wide was dug, forming a rough circle about 18 feet in diameter. This was packed with 3/4”-1-1/2” washed stone. 4” perforated drain pipe was incorporated in the gravel trench as well, sitting on about 4” of gravel in the bottom of the trench. Both the trench and the drain pipe were graded slightly, to ensure proper drainage.

Above you can see the completed gravel foundation. Rebar and salvaged T-posts were pounded into the foundation to tie it to the concrete stem wall that will be installed next. When building with cob, it’s important to install a stem wall so that the cob is not in direct contact with the ground. Otherwise the cob can be eroded by raindrops splashing on the ground. There is also the risk that cob standing directly in a puddle could wick moisture up into the walls, potentially causing mold or moisture problems. In this project, the stem wall was a minimum 18" high, made of stone harvested from the property and mortared with cement.


With the stem wall in place, the time had come to begin cobbing! We had plenty of clay-rich subsoil from the digging of the roundhouse’s foundation that we had saved in a large pile close by. We screened this through 1/2” hardware cloth for a rough cob mix. Our soil was a little clayey, so we needed to import a truckload of sand from a local quarry too. We also bought barley straw bales for use in the mix, and used lots and lots of collected rainwater.


With a good mix and nice weather, cob is a lot of fun to work with. In the photos above you can see the walls nearing completion. We incorporated lots of interesting details in the walls, including colorful glass bottles to let sunlight in; big pretty stones found in the desert were inlaid in the walls; small alcoves with wooden sills were recessed into the walls; and a classic cantilevered staircase was cobbed in as well. Wooden rough openings were framed for doors and windows, and these were anchored into the cob using wooden “dead men,” as well as lots of old salvaged nails to give the cob something to grip to. Electrical boxes were similarly anchored into the cob. Once the walls were cobbed up to the height of the upper bond beam, we used an old hatchet to cut channels into the cob for running the wiring. We could have buried the wires into the walls as we went along, but it seemed simpler to us to do it this way. In a photo above, Dan is soaking the wall and getting it nice and wet for adding some fresh cob, to patch our channels.


Above you can see our upper bond beam, built out of salvaged wood. Since the roundhouse isn’t actually perfectly round (we were going for the “organic” look), we built the bond beam in sections and fitted the sections on top of the walls as we went. Once it was all assembled, we disassembled it and put it back together on the ground. While the concept of reciprocal rafters is simple, in practice it can be a bit finnicky. So we decided to fit all of our rafters on the ground, and install the bond beam and rafters once we had it all perfect.
Since we chose to build with milled 4x6 timbers, instead of round timbers which is normally the case, we had to pay special attention to our joints. When doing a reciprocal roof the traditional way, using round timbers, you can simply notch them out with a chainsaw. But our milled timbers needed to be lapped and bedded just right, to ensure an exact fit.

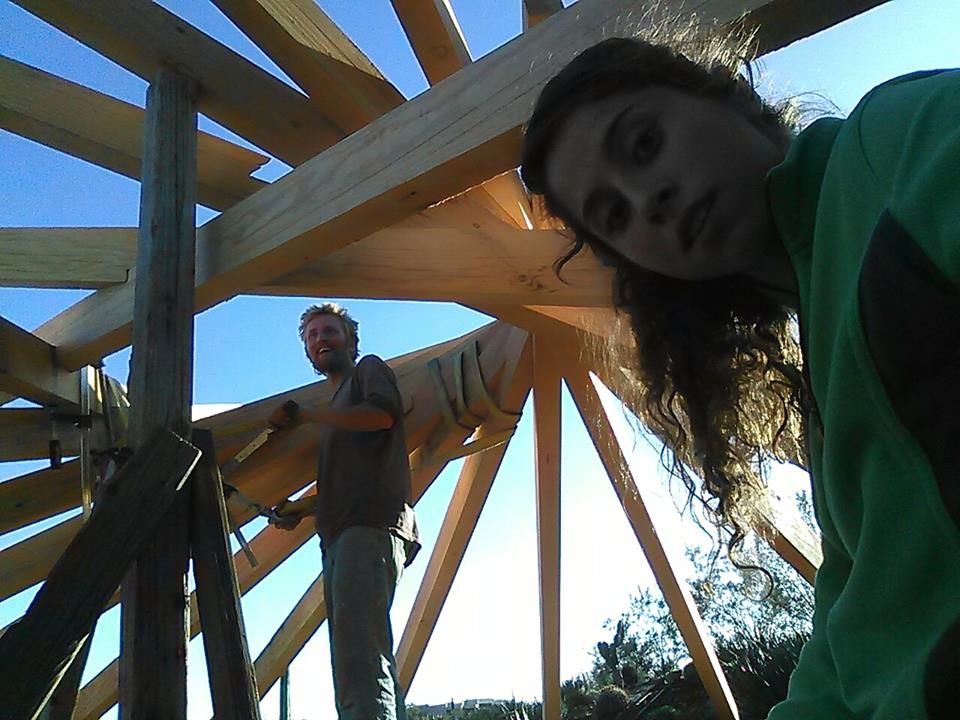
Once the rafters were ready to be assembled, we did a practice run at ground level. We erected a sturdy, reinforced column to rest the first rafter on while we worked. Once all of the rafters are in place, the supporting column can be removed. It requires some finesse to get the final rafter in place, since it should lock tightly between the first and penultimate rafters. Our tightly fitting joints were not easy to play with, either. We eventually figured out a trick: by carefully slipping a certain rafter out of place further down the line (and securely clamping it in position while we worked), we were able to fit our final rafter. We then returned to the slipped rafter. Because of the irregular shape of our building (not a perfect circle), we had an easier time slipping that certain rafter back into formation than the others. The righthand photo above shows us ratcheting the slipped rafter into position.
Speaking of which, something worth mentioning here is that we found this reciprocal roof particularly complicated to build, because of a couple of factors. One is the irregular shape of the building. This resulted in rafters of different lengths, and therefore rafters of different angles. Our roundhouse also has a partial loft and balcony built into one side of it, which meant we needed our rafters to sit higher on one section of the wall than the rest of the rafters. This resulted in all sorts of geometric confusion. We eventually figured out how to compensate for the relationship between the joints of the inner circle of the reciprocal roof, and the heights, lengths, and butt angles of each rafter along the outer circle of the roof. But I would recommend that if at all possible, try to keep your upper bond beam as perfectly round and level as you can. This could save you a lot of time later on, when it’s time to notch the rafters.


Once we had completed our test run at ground level and were happy with how everything fit together, we disassembled everything one last time. At this stage we took a day to clean and sand all of the rafters, and we gave them all a good coat of linseed oil. We decided to do this at ground level, because after sanding and oiling many rafters overhead, after installing, I have decided that I don’t like doing that anymore! It’s much faster and easier on the back to set up some sturdy work horses and do this job at ground level. This does mean that you have to be very careful when installing the timbers and when working around them, so that they don’t get all dinged up and dirtied and in need of a sanding and oiling again.
We then began carrying our roof piecemeal up onto the walls. First the upper bond beam was fitted and all the sections were screwed together. We pounded wooden stakes about a foot deep into the center of the cob walls, and screwed these onto the bond beam. Once the bond beam was securely anchored to the building, we erected our temporary support column at just the right spot and height, and began lifting up the rafters. It was heavy work, but light enough that four of us could lift them up into position by hand.
 | |
| We all held our breath while the support column was removed... |
 | |
| Success! Reciprocal rafters installed! |
Before removing the support column, we took the extra precaution of installing a 10” lag screw at every joint. In the photo above, Eric is drilling a pilot hole at an angle, so that the lag screw passes through plenty of meat. We put in the lag screws from above, to keep the fasteners hidden from view. Then came the tense moment as the support column was removed, and to our delight the reciprocal roof still stands!


 |
| A spiral of glass bottles cobbed into the wall, with the ceiling getting planked above. |
The photos above show the ceiling getting planked with culled lumber we received for free. We left our beautiful 4x6 reciprocal rafters exposed underneath. We also gave the loft area a wattle and daub ceiling instead of planks. Slip straw insulation was added on top, using the same ingredients as our cob mix (barley straw, clay-rich subsoil, and collected rainwater), but with a much higher straw content, “dressed” in a light clay slip.
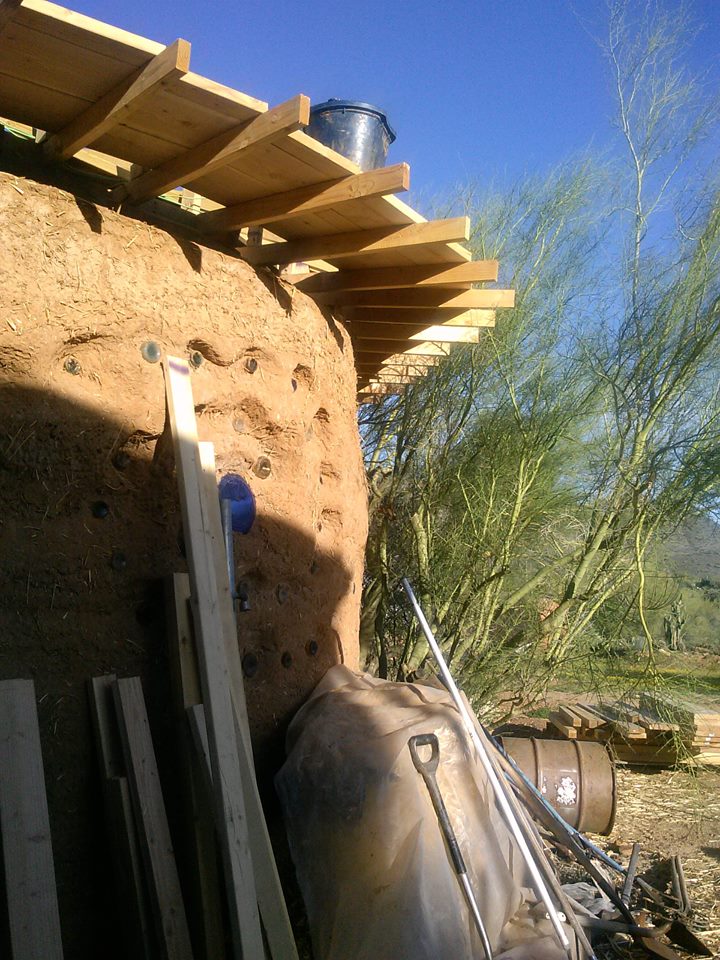

We also added two and a half foot eaves around the perimeter of the
roundhouse. It will be given a green roof by a future team of workers,
so pool liner was fitted on top of that.

Here is a photo of the finished ceiling. I love how clean and precise the milled rafters look, it’s an unusual touch for a reciprocal roof.

Living and working at Life Energy Awakenings was a truly awesome experience. I feel honored to have been welcomed into the loving community I found there, and to have experienced the impressive and inspiring wilderness of the Sonoran Desert. There is definitely an energy out there unlike anywhere else on Earth. Thank you Leanne, and all my friends out there, for sharing this experience with me. I hope that the cob roundhouse at Life Energy Awakenings will shelter and amaze future guests for years to come, just as I was during my time out there.
- Ben
Next post: Building an Off-Grid, Self-Sufficient Tiny Home
Last post: Redesigning the Chicken Ark: Unadilla Community Farm
Last post: Redesigning the Chicken Ark: Unadilla Community Farm


No comments:
Post a Comment